 InflowLayer
Connect an AI assistant
There are two ways to connect an assistant to your InflowLayer account. Pick the one that fits, then ask it to work in your projects: once connected, both work the same.
The connector address, needed in both ways:
https://inflowlayer-backend.seattleby.com/mcpWay 1: Sign in (Claude, ChatGPT, Cursor, VS Code)
Use it when you work in the Claude or ChatGPT app or website, or in Cursor or VS Code. No keys to copy: you press Connect, sign in to InflowLayer and allow access.
Claude (claude.ai, Claude Desktop)
- Open Customize, then Connectors. Click +, then Add custom connector.
- Enter a name (for example InflowLayer) and the address, then click Add.
- Click Connect next to the new connector, sign in to InflowLayer if asked, choose what Claude may access and click Allow.
- In a chat, click + at the lower left, open Connectors and make sure InflowLayer is turned on.
On a Team or Enterprise plan, an owner adds the connector once for everyone under Organization settings, then Connectors (Add, then Custom, then Web); each member then only clicks Connect in Customize, Connectors.
Optional: uploading files you attach. Most uploads need nothing set up: an image or a font from a link, or an SVG Claude writes as code. Only a file Claude holds itself, such as one you attach to the chat, is sent from Claude’s own environment. For that, allow it to reach the storage where the files go:
- In Claude, open Settings, then Capabilities. Turn on Code execution and file creation and Allow network egress.
- Under Domain allowlist, keep Package managers only and, in Additional allowed domains, enter
*.r2.cloudflarestorage.comand click Add. - Start a new chat. The setting applies only to chats created after you added the domain; Claude refuses to upload in older ones.
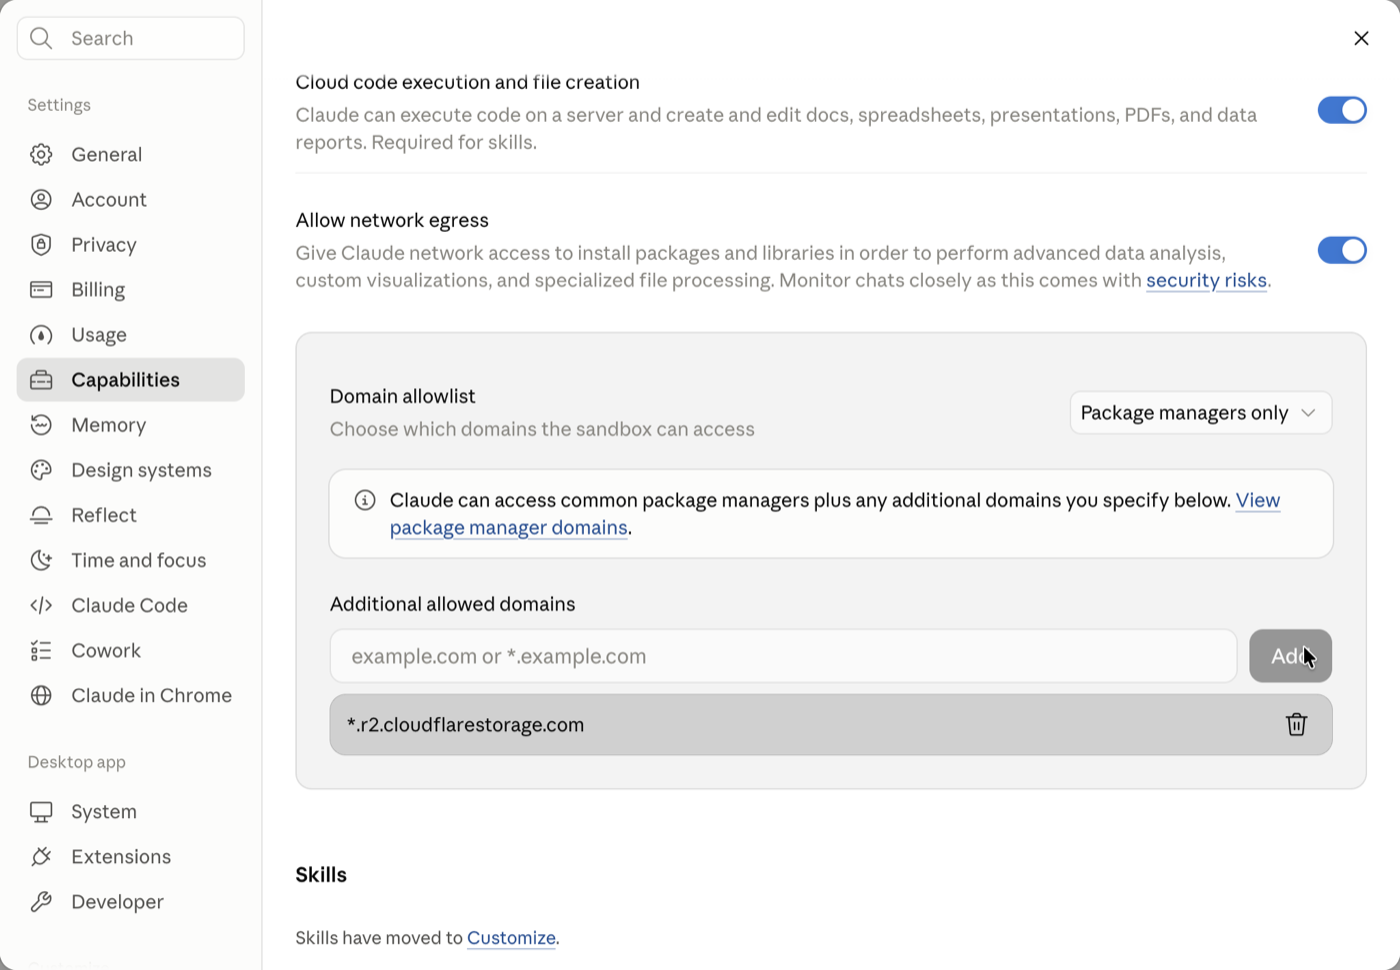
Without this Claude can still read and edit your projects and upload from links; only a file it holds can’t be uploaded. See What the assistant can do for how an upload works.
ChatGPT (chatgpt.com)
- Open Settings, then Security and login, and turn on Developer mode (Plus, Pro, Business, Enterprise and Education plans, on the web).
- Open Plugins, then Browse plugins. Click +, choose Create app, then Create MCP App. Enter a name (for example InflowLayer) and the address, and set Authentication to OAuth.
- Sign in to InflowLayer if asked, choose what ChatGPT may access and click Allow.
- In a new chat, click + in the message box, choose Developer mode and select InflowLayer.
Images and fonts you attach to the chat upload with no setup.
Cursor and VS Code
Click the button for your editor, confirm adding the server, then sign in to InflowLayer and click Allow when the editor asks.
Good to know: each person connects their own account, and you choose the access on the Allow screen. Every connection shows up under Integrations in the app as a key; revoke it there to disconnect. A connection works in one workspace: the one you are in when you click Allow, so switch to the right one in the app first. Menu names change from time to time, see OpenAI’s guide and Anthropic’s guide.
Way 2: API key (Claude Code and other tools)
Use it when the tool has no Connect button: Claude Code in a terminal, other programs that support MCP servers, or a Claude organization administrator adding the connector for the whole team.
- In the app, switch to the workspace the assistant should work in: a key works only in the workspace you are in when you create it. Then click your avatar (top right), choose Integrations and create a key. Give it access to what the assistant should work with, for example Projects and Components (add Assets to let it upload images, Fonts for fonts, Templates or Brands to work with those), or turn on Full access.
- Copy the key right away — it is shown only once. Anyone who has it can use your account, so keep it secret.
- In Claude Code, run this in a terminal (replace the key):In another tool, use the address and the header
claude mcp add --transport http inflowlayer https://inflowlayer-backend.seattleby.com/mcp \ --header "Authorization: Bearer YOUR_KEY"Authorization: Bearer YOUR_KEY.
Then: ask the assistant
The same in both ways. For example:
- “List my InflowLayer projects.”
- “In the project ‘Summer campaign’, insert the Polaroid component into the first artboard.”
- “Change the caption on that Polaroid to ‘Lisbon, 2026’ and make it bigger.”
See What the assistant can do for the full list.